Monday, July 29, 2013

Microgreens!


greens from the garden

The heat of the Texas summer can be too much for lots of greens but thanks to the magical rains we've been having I've actually got some baby arugula, basil, and parsley that are doin just fine. And I got inspired to try growing some microgreens. The term microgreens is just a fancy way of saying teensy baby plants. Microgreens are especially good for your health because they are loaded with all the life force it takes to change a little seed into a full fledged plant! Studies have shown microgreens to contain up to 40 times higher amounts of nutrients than their mature counterparts (see links below).

It is important to note that microgreens are not the same thing as sprouts. Sprouts are germinated or partially germinated seeds that are not actually planted. Their production requires dark moist conditions that can also be ideal for the proliferation of dangerous bacteria. Sprouts are ready to consume within a few days and must be carefully rinsed to ensure cleanliness. I sometimes like to sprout radish and clover seeds on the kitchen counter in a mason jar with a screen for a lid.

If sprouts are like infants, microgreens are more like toddlers. Microgreens are grown in soil, peat moss, or other mediums. They require high light levels and good air circulation and take one to two weeks until they are ready to harvest. The conditions that are ideal for microgreens do not encourage the growth of dangerous bacteria and their more developed and chlorophyll-rich leaves provide an additional boost of nutrition and flavor.


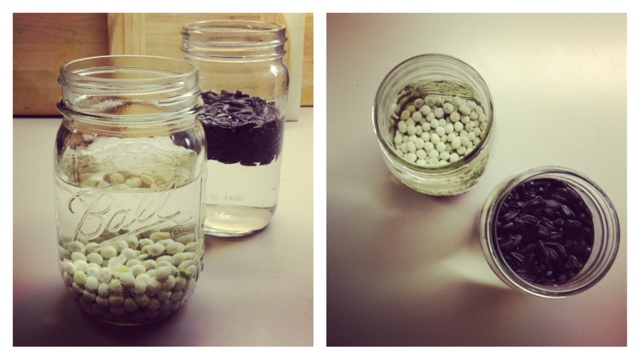
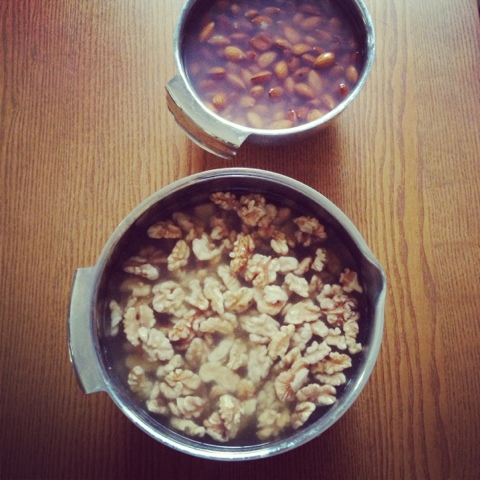
My first attempts at microgreens were pea shoots and sunflower sprouts. Right now sunflower sprouts are my favorite because of their juicy, almost sweet flavor. They remind me of my gorgeous friend Megan who grows them in Olympia at a magical farm called Calliope. 


The sunshoots and pea tendrils came up great! And so delicious! Learn more about how and why to grow your own microgreens here, here and here.


homegrown sunshoots in a handwoven basket


tender pea tendrils


I've been adding them to salads, rolling them up in my wraps, using them to top soups and toast, and tossing them in green smoothies. This salad in particular was an all time favorite. A freshly made cilantro pesto thinned with water to make a dressing enhanced the flavors of the lil greens and chickpeas perfectly.


pre-tossed


Garden greens salad of
homegrown arugula, basil, parsley and sunflower shoots
+
radicchio
 + 
chickpeas
+
castelvetrano olives
+
cilantro walnut pesto dressing


tossed


Sunday, July 28, 2013

Life changing loaf of bread


Do y'all know about the life changing loaf of bread? Sarah Britton posted it on her blog My New Roots in February and since then it has become wildly popular, for good reason! I salivated over her pictures in India while I longed to be back in a kitchen and could hardly wait to try it out when I got home. The results have lived up to all my expectations.

This bread really is amazing. Studded with nuts and seeds, gluten-free, vegan, and absolutely delicious, it is versatile enough to work with both savory and sweet toppings. Use it for sandwiches, dipped in hummus or pesto, or as a treat topped with honey or jam. It is so so simple to make and you don't have to be an experienced bread baker to whip up a loaf to delight yourself and your loved ones.


Bread and spreads: life changing loaf
chickpea miso
coconut butter
+
home canned blackberry jam with lemon & thyme from last summer in Olympia
+
homegrown arugula and pea shoots


Head on over to My New Roots to check out her gorgeous photos of the life changing loaf and read about its many health benefits. And just in case you wanna stay put, below are Sarah Britton's instructions word-for-word. I made a few changes to the loaf I baked. Most notably, I used sunflower seeds and almonds that I sprouted and dehydrated to make them more digestible. Also, I don't have a silicon loaf pan so I used a regular loaf pan lined with parchment paper.


The Life-Changing Loaf of Bread
Makes 1 loaf

Ingredients:
1 cup / 135g sunflower seeds
½ cup / 90g flax seeds
½ cup / 65g hazelnuts or almonds
1 ½ cups / 145g rolled oats
2 Tbsp. chia seeds
4 Tbsp. psyllium seed husks (3 Tbsp. if using psyllium husk powder)
1 tsp. fine grain sea salt (add ½ tsp. if using coarse salt)
1 Tbsp. maple syrup (for sugar-free diets, use a pinch of stevia)
3 Tbsp. melted coconut oil or ghee
1 ½ cups / 350ml water

Directions:
1. In a flexible, silicon loaf pan combine all dry ingredients, stirring well. Whisk maple syrup, oil and water together in a measuring cup. Add this to the dry ingredients and mix very well until everything is completely soaked and dough becomes very thick (if the dough is too thick to stir, add one or two teaspoons of water until the dough is manageable). Smooth out the top with the back of a spoon. Let sit out on the counter for at least 2 hours, or all day or overnight. To ensure the dough is ready, it should retain its shape even when you pull the sides of the loaf pan away from it it.
2. Preheat oven to 350°F / 175°C.
3. Place loaf pan in the oven on the middle rack, and bake for 20 minutes. Remove bread from loaf pan, place it upside down directly on the rack and bake for another 30-40 minutes. Bread is done when it sounds hollow when tapped. Let cool completely before slicing (difficult, but important).
4. Store bread in a tightly sealed container for up to five days. Freezes well too – slice before freezing for quick and easy toast!

Friday, July 26, 2013

chalkin at the Rosewood Collective


Last night I had the pleasure of doing chalk art for the summer party at the Rosewood Collective, home of Olive Vintage, Sound & True, and Loretta Flower. It was suuuper fun! 

I loved sidewalk chalk when I was a kid (who didn't?!) and started to use it again recently when I came back to Austin from India. In India I was so inspired by the chalk rangoli that the women use to bless the entrances to their homes each morning. I could not get enough of these gorgeous mini mandalas that welcome in gods, visitors, and good energy to the home. 


Rangoli in Mysore India, January 2013


So now I've incorporated chalk into my almost daily ritual.


I love it for the freedom that comes with its impermanence,
for its bigness and how I can sit or lay with it, on it,
for its playfulness and its imperfections.


More thoughts and chalks to come...


Wednesday, July 24, 2013

Butter lettuce rawvioli with carrot almond sauce


I love food that comes in packages. Not the plastic kind, mind you, but the kind you can eat. Spring rolls, collard wraps, raw raviolis! There's something so special about the making of these foods, a magic in wrapping and sealing up something delightful, like a secret. Only to release it again as the flavors unfold on the tongue.

Here is a second version of Rawvioli for the jewel house blog. This one features butter lettuce, a creamy walnut red pepper and oregano filling, and a delectable carrot almond sauce. It is really very simple to make, though it helps to have a food processor and a juicer for the carrots to make the sauce. You can use store-bought carrot juice if you must.


Butter Lettuce Rawviolis with Carrot Almond Sauce
adapted from The Raw Food Primer  by Suzanne Alex Ferrara


For the sauce
  • 1 cup carrot juice
  • 4 Tb. almond butter
  • 1/2 a ripe avocado
  • 2 Tb. shoyu (unpasteurized soy sauce) or tamari
  • 1 Tb. miso
  • 1 clove garlic
  • 1 Tb. maple syrup (not raw) or raw honey
  • 1/2 ts. turmeric powder
Place all ingredients in a food processor or blender. Blend until smooth, scraping down the sides and adding water to thin to desired consistency


For the rawvioli
  • 1 cup walnuts, soaked in water 8 hours (or use sprouted walnuts)
  • 1 cup chopped zucchini (about 1 medium)
  • 1 Tb. miso
  • 2 cloves garlic
  • 1 Tb. fresh oregano
  • 1 Tb fresh rosemary
  • 1 Tb. nutritional yeast
  • 1/2 cup minced red bell pepper 
  • 1/2 cup minced celery
  • salt and cracked black pepper
  • wilted butter lettuce leaves
  • basil, thinly sliced
Leave the butter lettuce leaves out of the refrigerator long enough to wilt. This gives them a slightly elastic quality that keeps them from tearing as you wrap the rawviolis.

Put the walnuts, zucchini, miso, garlic, herbs, and yeast in a food processor and blend until creamy.  Place the mixture in a bowl and stir in the finely chopped bell pepper and celery. Add salt and pepper to taste.

Remove the heavy center vein from each leaf. Place about a tablespoon of filling on a leaf and roll up into a little package. Serve atop the carrot almond sauce and flecked with basil ribbons.


Tuesday, July 23, 2013

Peach chia porridge


I've been making this chia-oat porridge lately in place of the cooked oat porridge I enjoy when the weather is cooler. It is easy to make and tastes fabulous! 

Chia seeds are an amazing food to include regularly in your diet. These wondrous seeds originated in South America have been a staple in native american diets for centuries. They are one of the richest plant-based sources of omega-3 fatty acids which reduce inflammation in the body, improve brain function, and reduce high cholesterol. They are a great source of fiber, helping to regulate the bowels and promote good digestion. Chia is rich in antioxidants that protect the body from free radicals and carcinogens, and contains minerals including calcium, phosphorus, magnesium, and manganese. Chia's combination of protein and fiber, and their gelling action gives a long lasting feeling of satiety, reducing food cravings between meals.

Basic chia porridge recipe

  • 3/8 cup oats (or just a little less than 1/2 a cup)
  • 3 Tb. chia seeds
  • 1 cup almond milk (more on how to make your own in a future post) 
Place oats and chia in a bowl and stir in the almond milk. In just minutes the chia will have soaked up much of the liquid! Let sit for a minimum of 30 minutes or overnight to fully hydrate. I like to set mine out the night before so it's all set when I'm hungry for breakfast.
 
From there, the possibilities for toppings and flavors are endless! Sweeten to taste with fresh and dried fruits and/or a nourishing sweetener like maple syrup, honey, coconut palm sugar, or stevia. Add a little something for texture and your favorite spices.

For this bowl I used:

  • 1 ripe peach, sliced
  • 1 Tb. dried goji berries
  • pinch cardamom powder
  • a sprinkling of hemp seeds
  • a couple drops of liquid stevia
  • Teensy bit of sea salt


This porridge makes a fabulous to-go breakfast too! Here's a snapshot of my post-yoga/pre-work breakfast this morning


In this bowl I added
  • dried figs
  • dried coconut
  • 1 ts. Maple syrup
  • Sea salt
  • Pinch of cinnamon
  • and a fresh red plum


Other flavor ideas: 

Banana + sprouted almonds + cinnamon

Coconut butter + fresh fig + vanilla bean

Dates + hempseed+ lemon zest

Dried apricot + orange zest/fruit + grated nutmeg

Fresh mango + cashews + goji berries

Cherries + Cacao nibs + cardamom


fulllll moon


love letter to the full moon

Sunday, July 21, 2013

Blonde macaroons


These little treats are easy to make and super delicious. In this healthy update of a classic recipe, good fats and whole sweeteners replace refined flour and white sugar. They are gluten-free and can be raw and/or vegan as you choose. This recipe is a great one to make with a child because it is so simple and rewarding. Another plus is that they travel well. I sent some on the plane with my dad, and wrapped some up in parchment as gifts for friends.

Coconut is a great source of healthy fat that nourishes the body. Though saturated fats sometimes get a bad rap, coconut oil contains medium chain fatty acids that have no negative affect on cholesterol ratios and actually help protect against heart disease. Our bodies use the medium chain fatty acids for energy instead of storing them as fat so it supports improved endurance and relieves fatigue. Coconut contains a large amount of lauric acid, the predominant fatty acid found in mother's milk, which exhibits antiviral, antimicrobial, antiprotozoal and antifungal properties and supports the immune system. Coconut is high in fiber and has a low glycemic index, helping to slow the body's absorption of sugars. This nourishing fat supports the absorption of many nutrients including vitamins, minerals, and amino acids. Coconut oil is also a wonderful moisturizer for the skin and hair, especially during the summer months when we are exposed to more sun. It acts as a sunscreen, improves the lipid content of the skin, and contains antioxidant vitamin E. I love to use it on my whole body!


Blonde Macaroons 
based on a recipe by the fabulous chef Renee Loux


  • 3 cups dessicated coconut
  • 2 Tb. raw cashew butter
  • 2 Tb. coconut butter
  • 4 to 6 Tb. raw honey and/or maple syrup (to keep it raw use honey, to keep it vegan use maple syrup. I used a combination of the two)
  • 1 ts. vanilla extract or the seeds of 1 vanilla bean
  • 1 ts. ground cinnamon
  • Pinch of good quality sea salt

Grind 1 cup of the coconut in a food processor until it becomes a fine powder. 

Add the cashew butter, coconut butter, sweetener, vanilla, cinnamon, and salt and blend well. Place mixture in a large bowl and fold in the rest of the shredded coconut. I found it easiest to use my hands to really get in there and mix it up! 

Roll the dough into 2 tablespoon sized balls. For raw macaroons dehydrate at 112 degrees F for 12-24 hours until they are as dry as you desire, or place in the freezer until firm. Alternately, bake them at your oven's lowest setting for 2 hours until a crust forms. 


Young coconut bounty in Bangalore India where you can buy them on the street for about 30cents! I miss thiss!

Sunday, July 14, 2013

Raw ravioli


Raw vegan ravioli featuring

watermelon radish + almond "cheese" + flat leaf parsley + smoked sea salt
and a light arugula salad dressed with extra virgin olive oil, spirulina, and smoked salt


Got some gorgeous watermelon radishes and I decided to try them as a variation of the raw foodie classic beet rawvioli. Who wouldn't love their bright green rims and rosy pink cheeks? 

Watermelon radishes are members of the Brassica family of vegetables. They contain the anti-oxidant sulforaphane which is shown to protect against numerous cancers. Fresh radish is rich in vitamin C, and contains folates, riboflavin, thiamin, and minerals including iron, magnesium, copper, and calcium. Paul Pitchford writes in Healing with Whole Foods that radish has a cooling thermal nature that moistens the lungs, cuts mucus, removes stagnation and detoxifies. Radish can relieve thick mucous (often associated with over consumption of dairy and animal products), clear the sinuses, relieve indigestion, and cool heat-induced conditions, and aid the body in purging toxins.


The radish rawvioli turned out fabulous! The lemon marinade softened them just enough to make them easy to eat with a knife and fork and kept their pink color vibrant. And the almond "cheese" is absolutely delectable. The combination of the garlic, nutritional yeast, and smoked sea salt gives it a satisfying, almost meaty depth. I really recommend using smoked salt if you can find it (Austinites won't have trouble locating it in the bulk spices at Wheatsville, Whole Foods, or Central Market) as the aroma it brings is almost intoxicatingly good. Served with a little side salad it made the perfect light supper for a warm summer evening.


Raw Ravioli
1 large watermelon radish
juice of ½ lemon
1 Tbsp. extra virgin olive oil
sea salt
Almond “Cheese”
Smoked sea salt, parsley and green onions for garnish

 1. Slice the radish into thin rounds. Ideally one would use a mandolin slicer, but if you're careful you can do it with a very sharp knife. You want them as thin as possible so take your time. Leave them circular, as I did, or stack and trim them into squares for style.
2. In a bowl, dress the radish rounds with the lemon, olive oil, and  a pinch of salt. Marinate for 1-2 hours.
3. Spoon a dollop of the almond "cheese" on one beet slice, then top it with a second slice. Repeat until you have the amount of Rawviolis you desire.
4. Garnish with parsley, green onions, and smoked sea salt.


Almond “Cheese”
Makes about 1 cup
Ingredients:
1 cup almonds, soaked and peeled
1 clove garlic, minced
2 Tbsp. green onion, minced
1 Tbsp.  nutritional yeast
zest of 1/2 a lemon
2 Tbsp. lemon juice
1 Tbsp. extra virgin olive oil 

Smoked sea salt (or regular sea salt)

1. Soak almonds in water for at least 8 hours. Drain, rinse well, and remove almond peels.
2. In a food processor, place all ingredients and blend to mix to the consistency of a thick spread, like goat cheese. Adjust seasonings to taste.


Wednesday, July 10, 2013

Warm salads and fabulous treats


Cabbage parsley slaw
 +
miso seasoned tempeh
+
ginger brown rice noodles
+
 kabocha squash
 +
lemon tahini dressing


 Cumin massaged kale with avocado and hemp
+
tamari tricolor quinoa
+
kabocha squash
+
homemade kraut
+
avocado and cilantro


This is what my lunches have looked like lately. My friend Marianne calls them "warm salads." Basically they are a blend of raw and cooked foods in a single bowl and they are so good. My body is loving the balance of textures, colors, and flavors and the infinite possibilities for variations. I start out with leafy greens, add some steamed root veggies, maybe some whole grains, rice noodles or cooked beans, lots of fresh herbs, and I top it off with a magnificent dressing or something simple like avocado and tamari.

Do you want recipes? Or are the photos inspiration enough? Lemme know will ya?
Speaking of inspiration, check out the gorgeous salads over at salad pride


And I also made...


Dark Chocolate Almond Butter Cups
with maple and mesquite


They are vegan, organic, gluten-free, healthfully sweetened, and absolutely decadent. I made raw sprouted** almond butter for the filling which also features raw mesquite powder.
  
Mesquite is a traditional food among native South and North American peoples that serves as a low sugar sweetener with the added benefits of nearly all essential amino acids, calcium, magnesium, potassium, iron and zinc. It balances blood sugar because it does not require insulin to digest or metabolize, and its dietary fiber slows the absorption of other sugars into the bloodstream (Navitas Naturals).
The mesquite I used was gifted to me by a sweet stranger who made my day with this little token of abundance. Its smokey caramel flavor tastes amazing paired with the almonds, maple syrup, and raw chocolate!

I want to share these gorgeous treats with y'all! I have a vision of having my delicious healthy foods for sale in some super cute shops around town, and catered for parties and events. I'd like to start out small and informal since so far I'm using a home (not a commercial) kitchen and don't have all the required certifications. So I'm calling in opportunities and advice!


 **Lastly, do you know about soaking your nuts, seeds and grains? Its a simple way to hugely increase their available nutrients and the body's ability to utilize them.


Learn more about soaking and sprouting here and here.


Sunday, July 7, 2013

A fabulous salad


Arugula, radicchio, romaine + coconut quinoa + pan cooked sweet potato + castelvetrano olives + flat leaf parsley + avocado spirulina dressing

Whew! That's a mouthful. And so was this salad. The basic idea came from this magic flavor equation:
 sweet potato + arugula + avocado = soo delicious
There is something spectacular about the sweetness, bitter crunch and creamy finish of this combination. A more basic version that I love is to roast a whole sweet potato, place it while its still hot out of the oven over a bed of arugula, and top with slices of ripe avocado and a bit of salt and pepper. Yum!


For a summer version (when it doesn't make as much sense to heat up house by turning on the oven) I opted to lightly steam the potatoes and then brown them in a skillet with a bit of coconut oil.


I cooked some quinoa, adding unsweetened coconut flakes in the last couple minutes of steaming. And it's all assembly from there: greens, then sweet potatoes and quinoa, topped with sliced olives and parsley. 


For the dressing I mashed an avocado with about a teaspoon of spirulina, a pinch of turmeric, salt, black pepper, and enough water to reach desired consistency. Simple and fabulous.


Friday, July 5, 2013

Grilling vegetables

Grilling isn't just for meat! Yesterday at my family's Fourth of July dinner get together I held down the veggie front with organic sweet corn, baby bok choi, radicchio, onion, and a portobello mushroom.


I dressed the portobello in a marinade of tamari, coconut oil, garlic, salt and pepper. The rest of the veggies got a dash of that as well before I popped them on the grill.


Everything came out suuper delicious! The bok choi took the shortest time on the grill and I found it helpful to prop their leafy green parts up on the other veggies to protect them from charring while the thick bottoms cooked. And the onions which I sliced into rounds and skewered took longest. I left them on for a good ten minutes after everything else which brought out their sweet caramel flavor. The mushroom was rich, juicy and so satisfying.


I ate everything as a grilled veggie platter with some fresh oregano and parsley from the garden, another dash of tamari, and topped with avocado. Next time I want to make portabello burgers!


Nieces: Naomi + Maya and me with our chalk on the Fourth